Monday, March 28, 2011

Finished raised beds!


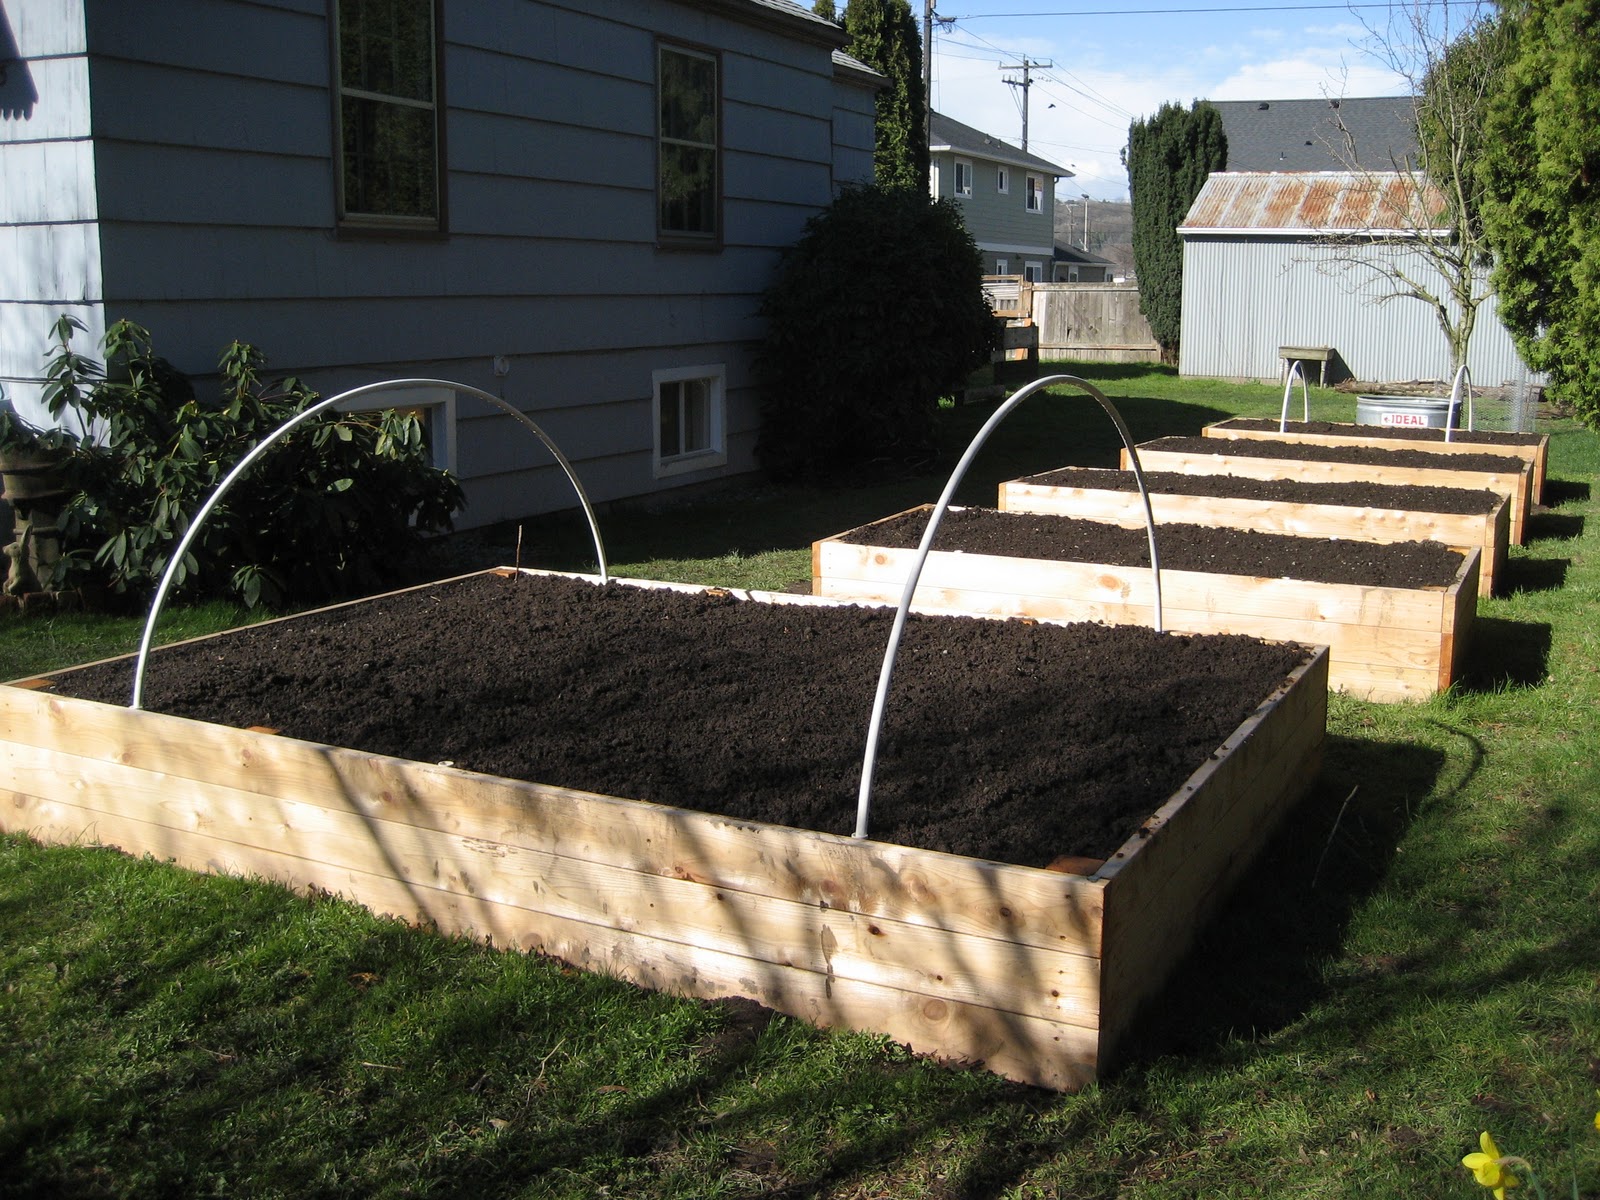
      Remember in our very first blog post I talked about our raised bed project? Well... FINALLY!!!! We are DONE WITH THIS PROJECT! woot woot! Ok, not completely. We still have to plant stuff and care for them for years to come, but the building of the raised beds is completed. We got the plans for these raised beds from Sunset's Western Garden Book. Very practical, easy to assemble, and pretty good lookin'. We added another 6 inches in height to Sunset's original specs so our beds measure 18 inches high ( actually about 16 1/2 inches because 2x4's are never actually 2 inches or 4 inches but who's counting ).  We made 4 beds at 4 feet by 8 feet and one monster bed which from henceforth shall be know as " the Beast " at 10 feet by 7 feet. At the very wise suggestion of our building guru and Husband's stepfather Bob, we stabilized the longer sections of boards with two by fours to prevent future warping. 


So that's a total of approx. 200 square feet of garden space. Did I mention we have a humongous yard? Another slick feature of the Sunset design is the permanent PVC pipes attached to the insides of the beds. This means we can slip in more PVC pipe to create hoops over the beds which we can cover with plastic for cold frames or bird netting to keep those destructive chickens at bay. At least until we can build a proper fence to keep them out. Yes. That's right. Yet another project. 


These are a few before and after shots of our north side yard. The picture on the top is from the day we bought our house almost two years ago. Below is how this same view looks today. The jumble of broken concrete in the foreground is our fire pit and the upside down tub is our future potato patch that husband scored off our neighborhood junk collector for 20 bucks.
    The pictures below are more before and after shots. It would take a lot more words than I am prepared to write here to describe the state of the yard when we moved in. It was so crazy. Rutted and piled with trash, we still stick our shovels in the earth and dig up junk. Some of the "highlights" include: aqua sox ( remember those? ), plastic sandals, deflated sports balls, Gatorade bottles, shingles, lots of drywall, doors, and crappy metal signs. We have found a few treasures though like a good sized enameled mixing bowl, old horseshoes, and rusty antiquated tools. We've also taken out a stand of yew trees towards the back to make room for future plans.


      In the end we only needed 10 yards of dirt instead of the projected 11 which was a relief to both our wallets and our backs. After all that shoveling however, we needed sustenance! Husband had spent a part of the day overlooking a pot of venison stew he made up a recipe for. Paired with a big ole' hunk of cornbread and the first gin and tonic of the season it was a perfect end to our day. One mission down 5 buh-jillion to go!

Monday, March 21, 2011

Bobbie Blue


    This is Bobbie! She's our 400 dollar 1972 Ford Explorer. She thought she was in for a better life moving to the city but it's the same ole song and dance here. Dump runs, hauling dirt, pulling out tree stumps, there isn't anything that we have asked her to do that she hasn't done and we couldn't live with out her.
    I recently took her over to Seattle Sawdust Supply to get two yards of their planting mix to start filling in our raised beds. My heart was in my throat a bit when the tractor dumped the second yard into her bed. She was riding real low but she made it home and we've been back twice for more dirt and we'll  go back three more times. Yup, it's gonna take six trips to completely fill our raised beds. We tried to get soil delivered from Cedar Grove but the product we wanted was too wet and they were steering people away from it.
    Soooo, plan B: we get a workout. I have personally shoveled 4 yards of dirt from Bobbie's bed to a wheelbarrow and then trucked it over to the raised beds. And when I can feel my arms again I plan to do more. Luckily Sawdust Supply is only six blocks away and Husband is on board to do a couple loads this Wednesday. We are well on our way to veggie bed completion!
    We are a little behind on starting seeds indoors but I am trying to think that now is better than never. So yesterday I clickity-clicked about how to make my own starter pots out of newspaper. I have been lusting after this fancy wooden apparatus from the Seeds of Change catalog that will make this process tidier but I can't bring myself to buy the thing ( probably husband's cheapness rubbing off ). I have to say it went pretty well using an entire Seattle Weekly and a nearly strait sided drinking glass. We planted some tomatoes, leeks and Walla walla sweet onions, stuck them under a fluorescent light in our basement and are keeping our fingers crossed.
   On a final note I gave the peepers a roost! They have so much fun getting up there and trying to stay on. Pickles always gets sleepy eyed when she gets up there but then she looses her balance when she falls asleep, so peepin' cute.

Monday, March 14, 2011

Meet the Peepers!

This is Polly and Pickles! Polly is a Golden Sexlink and Pickles is a Black ( sometimes called Red ) Sexlink. They are about a week and a half old, though we suspect that Pickles may be a little bit older 'cause her wings and tail feathers are more developed than Polly's. Baby chicks are one of thee cutest things on the planet but boy do they make a mess. I mean for how small they are they have destroyed their living space. They must take after me! You should see my studio. eep!


Food! These little fuzz balls are always on the hunt for something good to eat, even in the confines of their box. Their instinct to scratch to find something yummy has already kicked in and they have taken to scratching the food out of their feeder. Which really makes the aforementioned mess. But they are so dang CUTE when they scratch I instantly forgive them. Also, that is our cat Stella in the background asking so politely if she can come into the room to "play with" aka massacre the chicks. Not a chance kitty.


This is not our first chick rodeo. Last year we bought five chicks from The Grange in Issaquah. We lost one ( RIP Rex ) to unknown causes, so when these girls get as big as the rest we will have a flock of six. That means lots of eggs! We get on average probably about three a day now that it's coming up on spring. None of the breeds we got last year are really reliable egg producers ( we bought them for their egg color, aesthetics got the better of me yet again ) but these ladies are bred for egg production. But right now they are so fun to watch and hold and care for!

Saturday, March 5, 2011

Plans, plans, plans... Part Deux

    Last weekend we ordered our seeds for the garden we have been planning! We had a ton of seed catalogs Husband picked up at the Organicology conference he attended in Portland last month and I was excited to try out some of the companies I had never heard of. One of my main goals for seeds this year was to order from companies that sourced and grew their seed specifically for the short season growing period of the Pacific N.W. I figure this will give our N.W. garden the best chance of success!
   We ended up ordering form Siskiyou Seeds in Southern Oregon and Irish Eyes over in Ellensburg Washington. I wanted to order EVERYTHING from the Seed Savers Exchange catalog which deals solely with gorgeous heirloom varieties and has beautiful glossy glamor shots of all their product along with heart warming and morally affirming stories of heroic seed savers across the globe. sigh.
   I stayed sensible though, only in my fantasies will I be able to grow purple okra and Moon and Stars watermelon in this backyard. We are very pleased with our purchases and dealing with both of the companies through the interwebs was super easy. Someone even called me personally from Siskiyou to arrange a replacement for one of the items I had ordered. Very nice. Some of the stars of this growing season will be Buttercup squash, Nantes carrots, Walla Walla onions, DeCiccio broccoli, and Blue Lake beans. We chose varieties that freeze or keep well and while we didn't get anything too fancy we will be experimenting with some Tatsoi ( a spicy mustardy type green ) to keep salads interesting.
   We also started to prep for the raised beds.
     We had thought of gravel or wood chips or ( in our fantasies ) hazelnut husks for the area surrounding the raised beds. In the end however, we used what we have a lot of: sod. Boring I know, but hey it's FREE. What we end up taking out we will put in the spaces towards the back of the beds that are currently just dirt. It looks preeety nice and did I mention it was free? And maintenance? Mow it.
   After we placed the sod it looked pretty bumpy. We do not own a roller to smooth it out so Husband took out his trusty creasote beam and worked his magic. It goes like this:
Pick up rail road tie

Position railroad tie so it falls evenly.

Drop rail road tie.

Amazingly this works really well. Who needs specialized equipment when you have a husband under thirty? His words by the way.

Friday, March 4, 2011

Bittersweet...

   We recently discovered that our bees died. It's very sad and we are not sure exactly why, although we have some good guesses. We were trying out a top bar style hive that we think might have needed to be smaller and or better insulated to keep the bees more protected from the cold ( and more importantly here in the Pacific N.W. ) the bee murdering damp.
   The upswing however, is that we were able to collect all the honey that they had produced last summer and fall. So with the assistance of our bee keeping mentor Michael ( my step-father) my Mom and Ruby of course, we cracked into the hive to invesigate and harvest the comb. Opening the hive is always an adventure and even though these bees were dead it was still fascinating to look at the comb they had produced. The picture directly below is of the unfilled comb.
   Each bar of the top bar hive is a potential place for the bees to make comb. Some they fill with honey which is food for baby bees and nourishment for winter time. We took out all the comb that had honey in it, cut off the comb from the bar and loaded it into our lauder tun ( a beer making device which sounds fancy but is really just a 5 gallon bucket with holes drilled into it on top of a 6 gallon bucket with a spigot in it ).

A piece of comb filled with really dark honey.

The cocktail muddler. One of the many tools we repurposed for honey production. Who needs fancy equipment? 

After we squished the comb with the muddler we put the lauder tun into our downstairs bathroom with a space heater. We turned the heater on high and let the honey drip into the bottom bucket. This took a couple of days and some minor attention but it worked for the most part. I then spent a balmy morning ( a perfect task for a cold winter day ) squeezing honey out of comb with the help of a finely meshed grain bag. I ladled the waxless honey into quart mason jars and voila, 7 quarts of premium Georgetown honey!

We filled one jar with the honey/comb mixture aka Chunky Honey or Hunky before straining and now I wish we had done more. It is excellent on toast!

I put a little bit of comb into each jar before filling as well, one 'cause it's pretty that way and two 'cause it tastes good.

 Ruby the Helper Dog.
Cleaning up took the longest but Ruby helped me and now we have some excellent honey with a really nice rich flavor. I have been eating it everyday and using it as part of a cure for Ruby's cough and can't wait to try again this year to have a viable top bar hive on our little urban homestead.